There’s a special kind of joy in making homemade dog treats especially on a hot summer day when your pup is panting at your feet, eyes bright with anticipation. That’s how Pumpkin Yogurt Paw Popsicles became a favorite in our home. These charming, paw shaped frozen treats aren’t just adorable they’re loaded with nutrients, simple to prepare, and guaranteed to get tails wagging.
I’ll guide you through the story, share the simple ingredients, and give you all the tips you need to create this refreshing dog treat right at home.
How Homemade Frozen Treats Became a Summer Favorite for My Dog
It all started on a sweltering July afternoon. Benji, my lively little beagle with an uncanny nose for anything tasty, was sprawled out on the kitchen floor, completely overheated. I opened the freezer, searching for something to help him cool off and suddenly it hit me: why wasn’t I making frozen dog treats for him, just like the smoothies and ice pops I enjoy for myself
After a few messy experiments and plenty of taste tests (all enthusiastically supervised by Benji), I finally struck gold: a simple, two ingredient dog popsicle that not only delighted his taste buds but also aided his digestion and kept him cool for hours.
Two Simple Ingredients, Endless Tail-Wagging Delight
the secret to these Pumpkin Yogurt Paw Popsicles is in their simplicity:
Fresh Pumpkin Purée – Loaded with fiber and vitamins A, C, and E, pumpkin is gentle on your dog’s stomach and naturally nutritious. Be sure to use plain, unsweetened pumpkin purée skip the pumpkin pie filling, which often contains spices and sugars that can be harmful to dogs.
Plain Yogurt – Full of probiotics, calcium, and protein, yogurt supports healthy digestion and gut health for dogs who tolerate dairy. I recommend unsweetened, unflavored yogurt, and Greek yogurt works wonderfully if you want a thicker texture.
If your pup is lactose intolerant, you can swap in a non dairy alternative like coconut or oat milk yogurt but always check that it’s free from artificial sweeteners, especially xylitol.
Essential Supplies to Make Paw-Some Popsicles
Before you start mixing, gather the tools you’ll need:
- A silicone paw print mold (or any mold you like!)
- Mixing bowl
- Spoon or spatula
- Measuring cups
- Freezer space (you’ll need a flat spot for the molds to set)
Paw shaped silicone molds are easy to find online or at pet stores they make the treats irresistibly cute and are the perfect size for a quick, refreshing snack.
How to Make Paw Popsicles: Easy Steps from Bowl to Freezer
Here’s how I make Pumpkin Yogurt Paw Popsicles feel free to adjust the quantities depending on your mold size or your pup’s taste.
Ingredients:
- ½ cup fresh pumpkin purée
- ½ cup plain yogurt
Instructions:
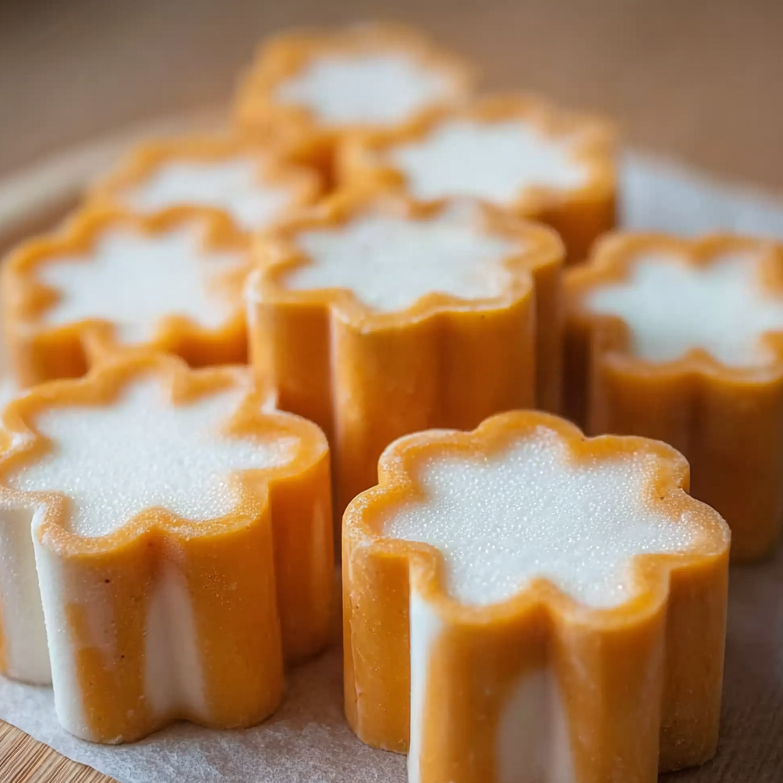
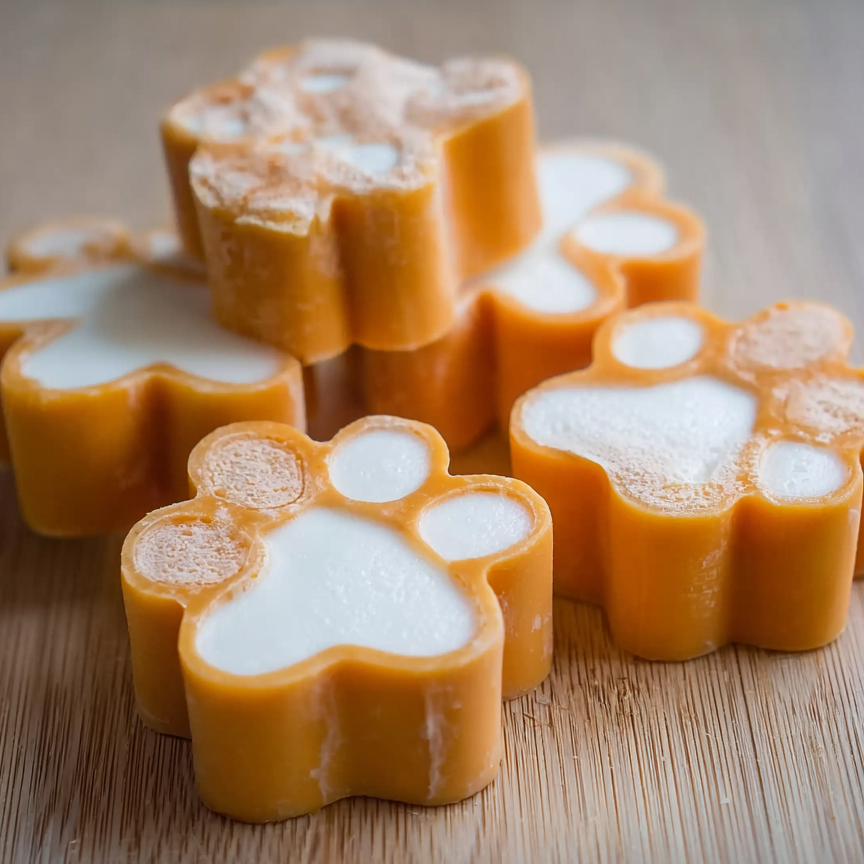
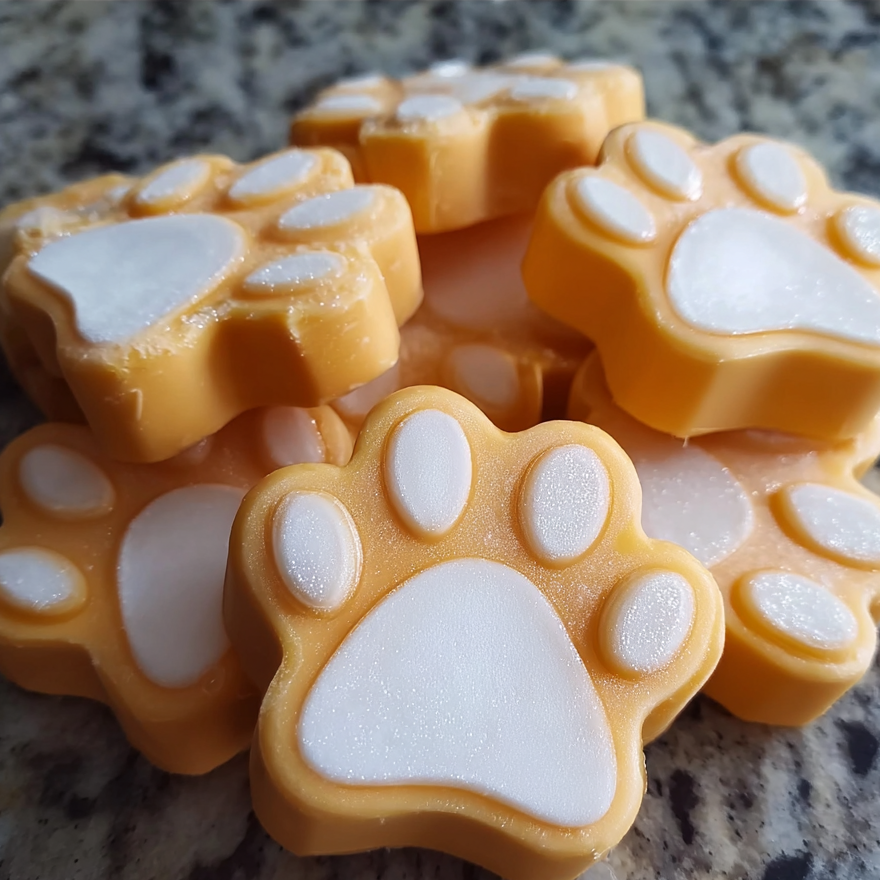
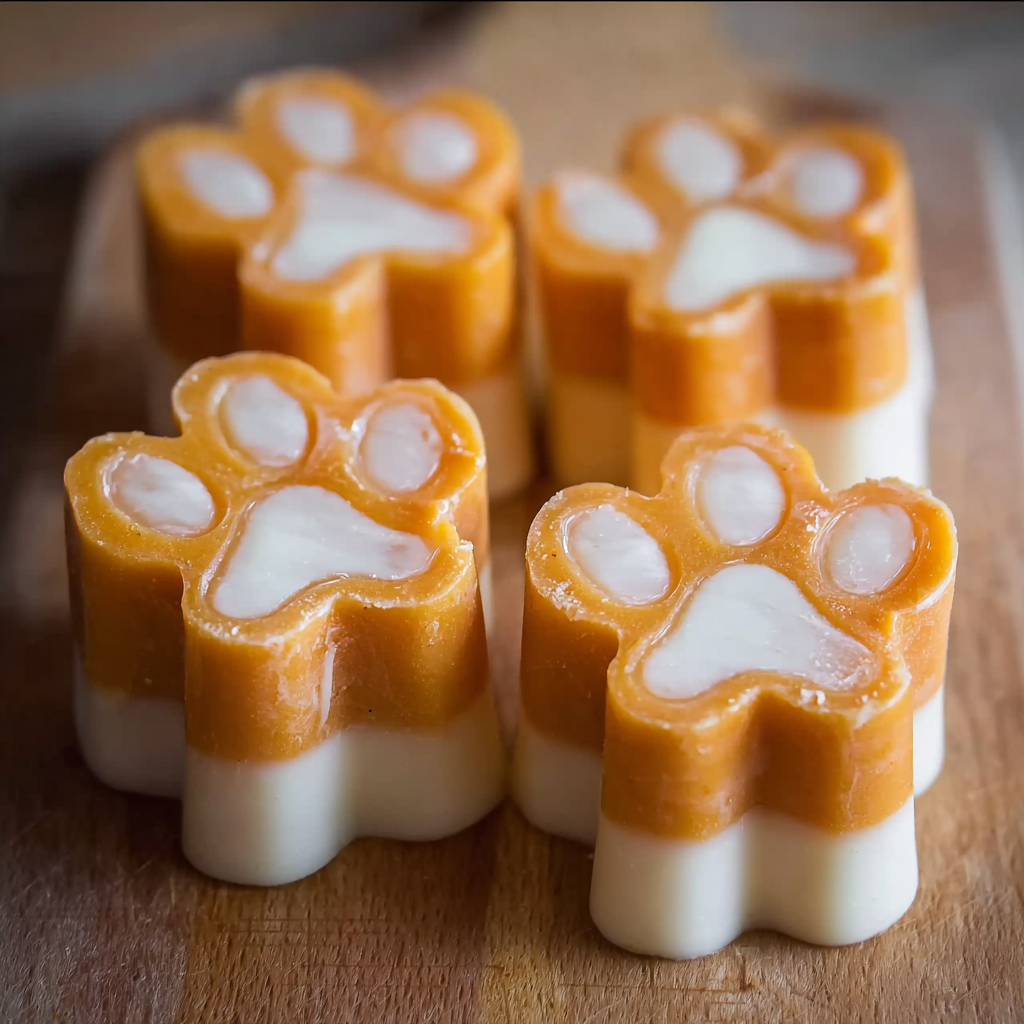
1. Prep the Mold
Place your paw shaped silicone mold on a baking tray. This makes it easy to move the mold to the freezer without spilling.
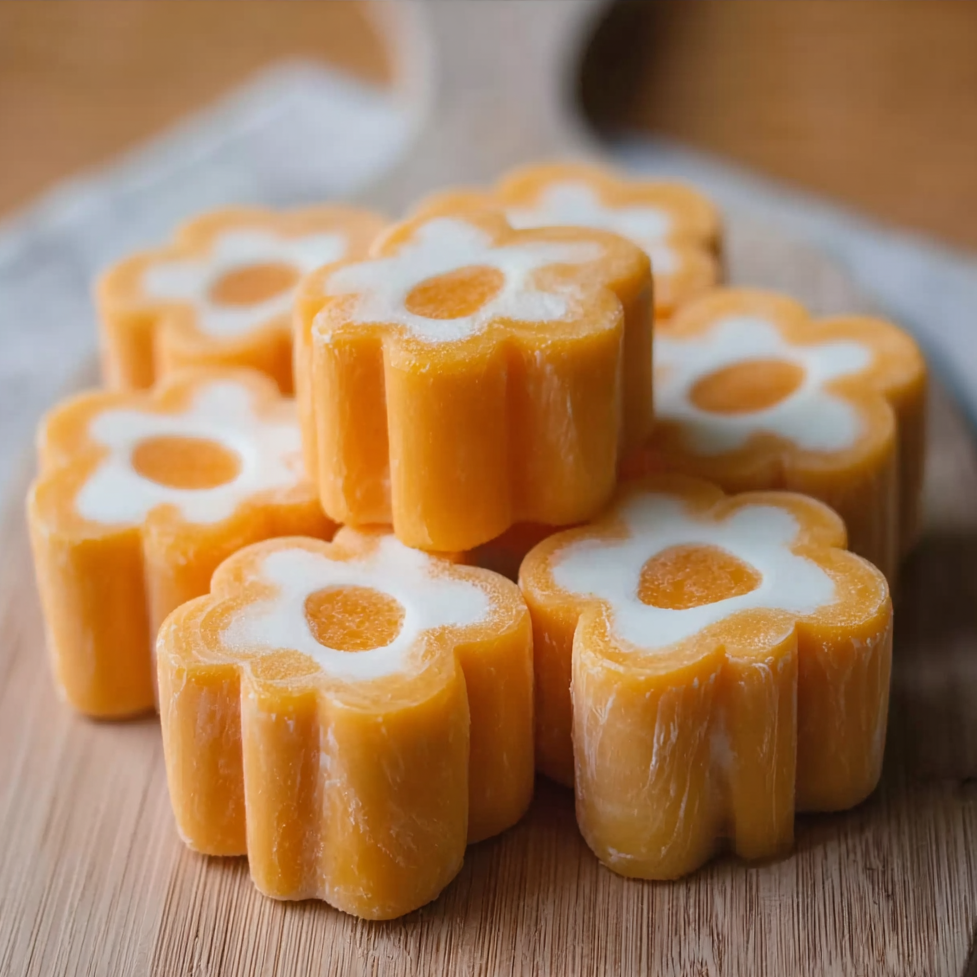
2. Layer the Yogurt
Spoon about a teaspoon of plain yogurt into each paw pad section of the mold. This creates a cute white contrast in the paw design.
3. Add the Pumpkin
In a mixing bowl, combine the remaining yogurt with the pumpkin purée until smooth. Spoon the mixture over the white yogurt layer in each mold, filling each paw to the top.
4. Freeze Until Solid
Transfer the tray to the freezer and let the popsicles set for at least 4–5 hours, or overnight for the best results.
5. Serve and Store
Once frozen, pop the treats out and serve immediately. Store extras in an airtight container or freezer bag for up to three weeks.
Pro Tips for Perfect Paw Popsicles
I’ve whipped up dozens of batches of these treats, and here are some tips to make sure they come out perfectly every time:
Smooth It Out: Use a spatula to press the mixture into the mold and level the tops this helps avoid bubbles and uneven surfaces.
Flavor Tweaks: Want to mix it up? Add a small spoonful of homemade, xylitol free peanut butter for dogs to give the popsicles a nutty twist.
Use What You Have: No paw molds? No problem! Mini muffin tins or regular ice cube trays work just as well. Adjust the amount per cavity and pop out the frozen cubes with a fork.
Serving Size: One or two paw popsicles per day is plenty for most dogs. These treats are a fun snack, not a full meal.
The Paw Fect Combo: Pumpkin + Yogurt for Happy, Healthy Dogs
When I first started experimenting with frozen dog treats, I wanted ingredients that were both safe and beneficial. That’s when pumpkin and yogurt caught my eye they make a naturally nutritious and tasty duo.
Pumpkin is a lifesaver for dogs with digestive issues. On days when Benji gets into something he shouldn’t have, a little pumpkin helps settle his tummy and firm things up. It’s gentle, soothing, and easy on the gut.
Yogurt brings probiotics to the mix, supporting a healthy gut microbiome. Just like in humans, a balanced gut can boost your dog’s immune system, improve skin and coat health, and even influence behavior.
Together, pumpkin and yogurt make a treat that’s both cooling and nourishing perfect for keeping on hand all summer long.
A Summer Favorite (Perfect Any Time of Year!)
While these popsicles are perfect for hot summer days, Benji enjoys them all year long. I even give him one after walks in cooler months as a tasty reward that helps hydrate him and keeps his mouth feeling fresh.
They’re also great for helping him relax. The slow licking, combined with the chilly texture, turns snack time into a calming sensory experience. For pups who get a little anxious, these treats can offer a soothing moment too.
Creative Spins to Make Your Pup’s Paw Popsicles Even More Delicious
Once you’ve got the basic recipe down, it’s both easy and fun to start experimenting with your own variations. Over the years, Benji and I have tried several different versions, and it’s amazing how just a small change can create an entirely new flavor or texture.
1. Banana-Powered Paw Pops
Mash half of a ripe banana and stir it into the pumpkin yogurt mixture. Bananas bring natural sweetness, potassium, and magnesium and most dogs absolutely love them. They also make the popsicles a bit creamier once frozen, and that subtle banana aroma? Totally irresistible.
2. Paw-Approved Peanut Butter Swirl
Stir one tablespoon of all natural, xylitol free peanut butter into the pumpkin mixture before filling the molds. This adds a boost of protein and creates a beautiful marbled effect if you don’t overmix. The aroma alone makes Benji practically dance with excitement!
3. Berry-Packed Blueberry Twist
Fold a few crushed blueberries into the yogurt layer. Packed with antioxidants, blueberries add a slightly tart flavor that pairs perfectly with the sweet pumpkin. This combo is especially delightful in the fall when fresh blueberries are in season.
Year-Round Fun: Seasonal Spins on Paw Popsicles
I like to give these popsicles a seasonal twist to keep things fun and festive. Here’s how I adapt the basic recipe throughout the year:
Fall: Add a pinch of ground cinnamon or a spoonful of mashed sweet potato perfect for cozy October afternoons.
Winter: Mix in some unsweetened applesauce and freeze in bone shaped molds. Even indoors, dogs love a cool, tasty treat!
Spring: Swap pumpkin for fresh strawberries when they’re in season. Blend them with yogurt for a pretty pink paw pop.
Summer: Combine watermelon juice with yogurt and a hint of mint for the ultimate refreshing snack. Watermelon is naturally sweet and hydrating just remove the seeds and rind.
Every season offers a new chance to surprise your pup with a treat that’s cool, flavorful, and healthy.
Paw Popsicle Problems? Here’s How to Get Them Just Right
Even with simple recipes, I’ve had a few flops literally! Here are some common hiccups I’ve encountered and what I’ve learned:
Too Watery: If your pumpkin or yogurt mixture is too runny, the paw popsicles may not hold their shape. Fix it by using Greek yogurt or straining regular yogurt through a cheesecloth to thicken the mixture.
Hard to Remove from the Mold: A good non stick silicone mold is key. If the treats stick, run warm water over the back of the mold for a few seconds before gently pressing them out.
Dog Doesn’t Like Frozen Treats: Surprisingly, not all pups love frozen snacks. If yours turns up their nose, let the popsicle thaw for a few minutes before serving, or try serving the same mixture as a chilled, pudding style treat instead.
Making Treats Together: Tail-Wagging Fun for You and Your Dog
There’s something deeply satisfying about creating a treat from scratch that your dog truly loves. For me, making popsicles has become a calming little ritual I often do it while listening to music or Face Timing with a friend. Benji is always on duty as taste supervisor, and the moment I reach for the yogurt tub, his ears perk up.
Treat making can also be a fun family activity. My nieces enjoy helping me fill the molds and “test” the paw shapes once they’re frozen. It’s a hands on way to teach kids about caring for pets and paying attention to the ingredients in their food.
Understanding Pet Nutrition: The Importance of Choosing the Right Ingredients
One of my biggest motivations for making homemade dog treats was knowing exactly what Benji was eating. After seeing some alarming ingredient labels on store bought snacks, I knew I wanted something better.
Pumpkin and yogurt are simple, wholesome, and beneficial ingredients. Even when I experiment with new recipes, I stick to one rule: if I wouldn’t eat it myself, I don’t give it to Benji.
Being mindful of ingredients also lets me tailor treats to Benji’s specific needs. With his sensitive stomach, I avoid dairy heavy snacks and stick to low fat yogurt. For dogs with allergies or sensitivities, homemade treats are the perfect way to stay in control of their diet.
For pups who enjoy chewier, protein-rich options, treats like Bull Penis Dog Treats can be a fun alternative they’re long lasting and satisfy even the most enthusiastic chewers.
Spread the Love: How to Gift and Keep Your Treats Fresh
These paw popsicles make delightful, thoughtful gifts for fellow dog parents. I’ve brought them to dog birthday parties (yes, those exist in our neighborhood!), handed them out at training classes, and even packed a few for road trips in a cooler.
When gifting, I like to use small reusable containers or silicone bags and include a handwritten note listing the ingredients. It’s a simple, heartfelt way to share something homemade and healthy.
Storing them is easy: keep the popsicles in an airtight container or a zip top freezer bag. They’ll stay fresh for up to 3–4 weeks though in my house, they rarely last longer than a week!
One Last Thought from Me
Making treats at home has completely changed the way I connect with Benji. It’s not just about feeding him it’s about pouring time, energy, and love into something that brings him pure joy (and plenty of drool). Whether it’s Pumpkin Yogurt Paw Popsicles or a fresh batch of Oatmeal Cookies for Dogs, the happiness is in the process just as much as the treat itself.
So, the next time the sun is blazing and your pup could use a cool refresher, give these popsicles a try. I promise they’ll be a hit and chances are, you’ll find yourself making them again and again.

Pumpkin and Yogurt Paw Pops for Dogs
There’s a special kind of joy in making homemade dog treats—especially on a hot summer day when your pup is panting at your feet, eyes bright with anticipation. That’s how Pumpkin Yogurt Paw Popsicles became a favorite in our home. These charming, paw-shaped frozen treats aren’t just adorable they’re loaded with nutrients, simple to prepare, and guaranteed to get tails wagging.
I’ll guide you through the story, share the simple ingredients, and give you all the tips you need to create this refreshing dog treat right at home.
Ingredients
- ½ cup fresh pumpkin purée
- ½ cup plain yogurt
Instructions
1. Prep the Mold
Place your paw shaped silicone mold on a baking tray. This makes it easy to move the mold to the freezer without spilling.
2. Layer the Yogurt
Spoon about a teaspoon of plain yogurt into each paw pad section of the mold. This creates a cute white contrast in the paw design.
3. Add the Pumpkin In a mixing bowl, combine the remaining yogurt with the pumpkin purée until smooth. Spoon the mixture over the white yogurt layer in each mold, filling each paw to the top.
4. Freeze Until Solid
Transfer the tray to the freezer and let the popsicles set for at least 4–5 hours, or overnight for the best results.
5. Serve and Store
Once frozen, pop the treats out and serve immediately. Store extras in an airtight container or freezer bag for up to three weeks.
Notes
I’ve whipped up dozens of batches of these treats, and here are some tips to make sure they come out perfectly every time:
Smooth It Out:
Use a spatula to press the mixture into the mold and level the tops this helps avoid bubbles and uneven surfaces.
Flavor Tweaks:
Want to mix it up? Add a small spoonful of homemade, xylitol free peanut butter for dogs to give the popsicles a nutty twist.
Use What You Have:
No paw molds? No problem! Mini muffin tins or regular ice cube trays work just as well. Adjust the amount per cavity and pop out the frozen cubes with a fork.
Serving Size:
One or two paw popsicles per day is plenty for most dogs. These treats are a fun snack, not a full meal.